Sunday, 27 February 2011

DIY Abstract Painting

Back again today to show you all a painting I spent most of the day making! A little backstory... painting was my favorite hobby as a child/teenager... but I've just been so busy with "life" since college that I haven't picked up a paintbrush in years (other than to paint the house with). So as I was deciding on what to put above the TV, I thought it might be fun to try my hand at a large painting. I chose abstract, because I figured you really can't go wrong. Plus I wanted something basic and subtle, in ocean blue hues. I had an idea of what I wanted, but nothing I was trying to replicate exactly.

I found this painting online and it was probably the closest thing to what I was picturing in my head:


So I went off to Michael's to purchase some supplies. They were having an incredible sale on art supplies—40% off canvases, plus I had an additional 20% off coupon, plus 40% off paints and brushes. Score!

The type of painting I wanted to do really works best with oil paints, but I didn't want to deal with all the turpenoid and messy cleanup. Plus I didn't want to wait a day to be able to hang it up, so I kept things simple and went with acrylic.

I ended up finding four 18x24" canvases that I would arrange into a square. I also picked up plenty of white, blue and yellow (as you can make virtually any shade of turquoise with those colors). I also grabbed a nice brush, a palette, and some gel retarder to extend the drying time of the paint.

With the sale price and coupons, I paid under $7 for each canvas, and all the paints/accessories were only around $35. That makes this project only $60, not bad!

Here was my arsenal of goodies:


Since it was such a gorgeous day outside (84 degrees!) I set up my workstation outside by the pool.


I added generous amounts of paint to my palette..


...and mixed some retarder into each color (which was especially helpful since I was working outside in the sun).


I really had no plan in mind when I started to paint. I figured I'd just make the brush strokes and let whatever happens happen.

Here's a little action shot:


First quarter completed...


Fast forward maybe 45 mins later and the canvas was full:


I went back and made a few tweaks, smoothed some things out, and ended up with my first finished canvas:


This first one took a good hour, at least. By #2 I was getting the hang of it and cut the time down significantly. Here's how the second one turned out:


And the third...


And finally, #4:


Whew! All in all, it was probably about four hours from start to finish. I had plenty of paint leftover (I was worried I'd use it up at first), so now I'm all set if another painting project comes up.

Oh, and we had a visitor stop by to sunbathe by our pool:

His name is now Harry the Heron.

I fed Harry some ham.


And then he went and found my stick stash (where I find all the cool sticks to decorate with)...


Apparently he has a stick fetish like I do! I can only assume he took it back to his place to decorate his mantle or use it as a centerpiece. They are some sweet sticks, afterall. Harry, if you're reading this, you are more than welcome to come back for more.

Anyway, back to the paintings...

Here's the official before shot:


And here they are, doin their thing, injecting some life into the room:


Yay for color! Our house is getting more colorful by the day. I promise I won't go overboard though... I'm stickin with the palette.

Hopefully this can serve as inspiration/motivation for you guys to get out there and make your own painting! The worst that can happen is you paint your canvas white and start over. No biggie. I would recommend an abstract like this if you're just starting out, and stick with acrylics. It's easy and fun, sometimes even therapeutic (and cheap if you shop during sales!)

Off to watch the Oscars... have a great Sunday night everyone!


Speakers & More Art.

Music is huge in our house. You'll find it playing in some form at any given time... we really can't get enough. So Brad and I were anxious to install the in-ceiling speakers we bought for each room, and all the parts had just arrived in time for a weekend install.

I dream of the soothing melodies of Christopher Cross's Sailing and Enya's Caribbean Blue filling the house, on repeat, all day and all night...that's my version of heaven, I tell you. Although Brad probably doesn't share these sentiments, so I'll have to allow some Rush tunes to break it up from time to time. And of course we'll have to rock the Pandora trance channel for some crazy summer night dance parties.

So we kicked off our weekend with Brad in the attic Friday night, drilling speaker holes and fishing a network of wires to his receiver (located in the hall closet). We bought a pair of speakers for each room (garage included) along with some poolside rock speakers. He completed the garage and kitchen that night, while Saturday was spent on the office, living room, master bedroom, and pool (today he's working on the sunroom and man cave).

It was a fairly simple (but messy) process.

First he gets in the attic while I stand below, directing him on placement. He drills a pilot hole, comes back into the room, and cuts the hole with his "Hole Pro" cutter, and secures the speaker.

Here's the process in pictures:


Hole Pro in action


Mounting the speaker

Snapping the grill into place
Ta da!
Finished living room

So there you have it. Stereo sound in every room, gotta love it! We can switch each room on/off through the switchbox in the closet, and listen to music from virtually any source (radio, itunes, TV music channels, pandora internet radio). These speakers will get some good use.

Here's what every room looked like while Brad was still trying to get the hang of the hole pro:


Small price to pay for music, right? :)

And here's one of our rock speakers, facing the pool:


While Brad was in the attic, I had some downtime to finish some projects.

Like the office.

A week ago I had dumped our old filing "system" and opted for a streamlined binder and box organization method. I was loving the new setup, but felt like it needing some sprucing up.

Here's a reminder shot of how it looked last week:


And here it is today:


I picked a color palette, made some patterns, added the text, measured out the sizes I needed, printed and cut them out. Much cheerier, right?


I leave the cabinet door permanently open now because it just makes me happy to look at it. And I get excited anytime I need to look something up. Now that's how filing should be!

UPDATE: I've added free binder printables here!


While I was working on the project, the UPS man came and delivered a package I had been waiting on from the Container Store. It was my new wall file!

I've been needing a way to organize all my loose papers on my desk, and when I discovered this brocade wall file online, I thought it was perfect (if you know me and my love for anything white with a cutout pattern). So you can imagine my excitement when I go to order it and discover that it's on sale ($10 off!) making it around $25 shipped. I would still consider that a splurge for something so basic, but it's already paid off in the amount of happiness it brings just looking at it.

I picked up a set of colorful file folders at Walmart for $3, and here's the end result:


Love this detail!

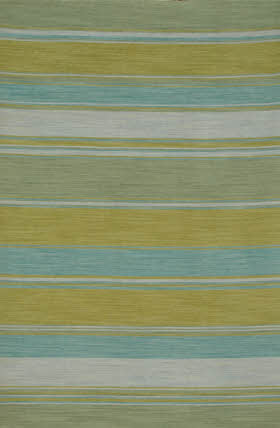
So that's how the office is shaping up. A few days ago I purchased this rug in 5x8 for it:


I'm thinking it will match the color scheme I've got going on quite well. Let's hope so! Pics as soon as it's in.

And finally... we've got some more art on the walls.

Starting with the foyer art I finally hung. I went out and bought some command strips, since these particular frames have a flat back and the hook and nail made it stick out from the wall. It all worked out in the end:

These are 12x16 prints inside Ikea's $17 Virserum frames, found here.


The prints can be customized and purchased in any size, here and here.


Just around the corner, I printed and hung these:


These are 11.5x11.5" prints, framed inside Ikea's $20 Virserum frames, found here. Prints can be customized and ordered in any size, here and here.

Wall Color on left: Valspar's Magic Spell. Wall Color on Right: Valspar's Bonsai.


Finally getting some finishing touches in the house feels great!

I wanted to add a little something to our bare hallway wall, so I decided to make a couple maps that had significance for us. I chose our birth cities of New Orleans (Brad) and San Francisco (me):


City maps found here

Here they are framed and hung:


Now we have a happy hallway :)

And finally, Brad's "man cave" art is finished (...for now):


Gotta run, Brad's breaking stuff in the ceiling and needs my help... be back later today!


Sunday, 20 February 2011

I heart art.

It's in my DNA... has been since birth (I guess that's a given when both sides of your families are artists). Needless to say, the house has been feeling pretty soul-less with no art on the walls thus far.

I've been looking forward to this weekend for a while now, as my printer has finally arrived and I was able to start making test prints of several pieces I've been creating over the months. I didn't get as much done as I would have liked, but it's a start. I'll be slowly adding to the collection and hanging prints as I go (and I'll definitely keep you all updated along the way!)

Without further interruption... let's start with the dining nook. My plan for this space is to add pops of turquoise through art and accessories, so the color palette would be whites, aquas, and brown-grey/greige.

We started with the greige paint color (Valspar's Magic Spell), added in the chandelier and mirror last week, and today we installed a couple floating shelves and added some accessories:


I stole the thrift-store painted vase and painted white sailboats from the console table in the living room. Not sure if they will be staying, but they fit in well with the theme.

Here's a close up of the bird print:

Available for purchase here

Opposite the shelf wall is another print, fitting for the room's purpose:

Available for purchase here


And here's the other side of the room:


There's only three walls, as it's open to the living room. And they are all finally full, woohoo! I'm still planning on adding wainscoting on the bottom... that should be a fun experience.

Moving on to the living room. I had time to add two pictures to the corner of the room. Again, I want a cohesive feel throughout the main living area, so I opted for turquoise prints. These can be easily changed whenever the mood strikes, but I thought for now I'd add a little bit of playfulness with this octopus and seahorse:

Available for purchase here


Fun, right? Those are the closest things we have to pets right now... I feel like I should give them names or something :)

And finally, I was really looking forward to hanging these two prints in our entryway above the coatrack, but I didn't have the necessary hardware to do so (it would have been too hard using the wire and trying to get them exactly lined up to each other... we'd probably have 40 holes in the wall trying to get it right). So tomorrow after work I'll have to stop by Home Depot to grab some picture frame hooks. But I snapped shots of them anyway:

Available for purchase here

I can't wait to see how they look up on the wall!

That's it for now in the Art Update category. But on another note, since it was such a gorgeous day outside, Brad decided to be the first to break in the pool!


About 0.04 seconds after this shot was taken, he was seriously regretting his decision of cannonballing into 60 degree water and jumped out just as fast as he went in. Now I know to wait a few more months :)

That's it for this weekend, folks. If my schedule allows it, I'll be printing and hanging more art every night this week, so check back often!