I left off my last post with a photo of my temporary storage station in the office:

Clearly, old boxes are not an ideal setup.
So I hopped on Craigslist to search for the perfect sized cabinet to fill the short wall. Almost immediately... I found it:
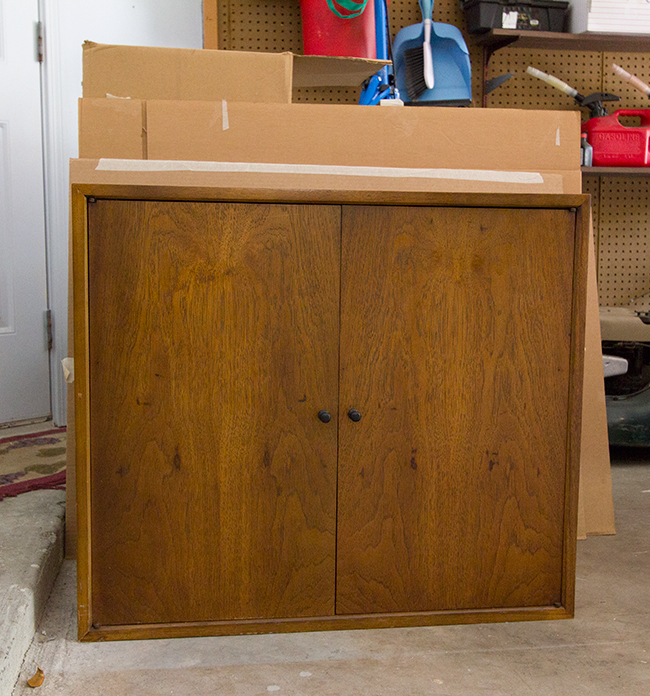
It had a simple design, nice and sturdy build (solid wood), in great condition, and my favorite part—only $40 (actually, it was listed for $35 but I wanted it so bad I told him I'd give him $40 to hold it for a couple days while we were out of town).
It was per-fect.


When it came to my refinishing plan, I went back and forth with the best approach to take. I knew I wanted to do something a bit different than my standard distressing technique, and I felt that I finally had enough experience under my belt to give it more of a smooth factory-finish look.
The idea of wallpaper also popped into my head, so I checked Pinterest for some inspiration.
I liked what I saw:
 |
| Source |
 |
| Source |
 |
| Source |
The idea of paintable wallpaper intrigued me, so I decided to explore my options.
I hit up Lowe's and Home Depot and the selections were very limited (HD didn't have any, actually). Boo. So I went online and found a plethora of designs... but most were on the pricey side and from sketchy looking websites. Lowe's was the cheapest, it seemed, at around $20 a roll.
I was really liking this one and this one, and ended up going with option #2. Delivery was scheduled for a week later, so in the meantime I started on the cabinet.
My work process was as follows:
Step #1: Dissassemble and collect all hardware:


Step 2: Sanding
My wood was in good shape and didn't have any lacquer, so all I needed was a light sanding (200 grit) to remove any surface gunk and allow the paint to grip better. If yours has any deep scratches or gashes, take this time to fill it in (using wood putty or something similar) and then sand down smooth.

Step 3: Degloss/wipe down
I use Liquid deglosser based on what I've read online, but I'm sure a damp rag would do the trick as well. The goal is to get a clean, dust free surface.

Step 4: Add legs
I decided that I needed some height, so I picked up these 4 legs and bases for around $25 at Lowe's:

I measured out equal distances on all four sides and attached the bases:

Once they were all secured, I simply threaded the legs in and had a cabinet that looked like it was made to be freestanding instead of attached to a wall.

Step 5: Tape off all areas that you do not want painted.
For me this was the metal magnets on the doors and base.
Step 6: Prime

This is a personal decision, but I went with a spray primer for a couple reasons: #1 It was cheap, fast and easy. #2 Since my wood was already in great condition to take paint and I was using an advanced paint made for cabinets, I felt comfortable with a thinner coat of primer.

As you can see, the coverage isn't the same as regular paint would have been, but good enough for what I needed. Valspar certainly isn't the most recommended brand, so you may have a more even finish with something like Rustoleum.
Tip: Sand between every coat! Spray paint especially tends to leave a very rough surface. 200 grit by hand is all you need to smooth out the roughness.
Step 7: Paint.

I used the same paint I used on my kitchen cabinets, Benjamin Moore's Advance in off the shelf white. I wanted something extra durable and in a classic color so I wouldn't have to repaint it down the road. I used a foam roller, which I always recommend for painting anything. Coupled with sanding between coats, the finish will be silky smooth.
Tip 1: Take your time when painting furniture. I learned this the hard way when I tried to finish my nightstands in one day and ended up with chipping paint. Do not try to squeeze it into one day, it's not worth it!
When you aren't rushed and can take your time, the process is so much more enjoyable. This also allows you to deal with any Oopsies that pop up... and they do, quite often.
The paint label says to wait several hours between coats, and that's exactly what I did. Actually, since I had an entire week while I was waiting for the wallpaper to arrive, I only applied one coat a day.
Tip 2: Watch your edges. Paint will build up along them and before you know it, you have this:
 |
| This is the reason I started distressing everything! |
It's tedious, but necessary if you want a professional look.
Tip 3: Let the paint dry for as long as you can before placing objects on it. Paint will feel dry to the touch within hours, but really needs at least 36-48 hours to fully cure and not risk damaging the finish, especially with heavy objects.
After my first coat of paint, I noticed these holes along the sides that I wasn't loving:

I should have patched and sanded before painting, of course, but they were bothering me so I went ahead and filled them anyway:

Yep... that's wallboard joint compound. I always preferred the texture to wood putty (use it at your own risk).
Tip: Paint will not "fix" imperfections! It actually makes them more obvious. When you patch something, it may look and feel smooth to the touch, but once you paint over it you'll notice the unevenness. Let the putty dry completely (apply more than one coat if necessary), use a flat palm sander, and take your time to make sure it's as smooth as possible before painting.
After letting the putty dry for a day, I came back and sanded and applied my first coat:

Much better, right?
This step took me back a day, but I didn't mind at all because I had set aside extra time for the inevitable hiccups that are bound to occur.
Step 8: Wallpaper
As my last coat of paint was drying, my wallpaper finally arrived:

And it was not even close to the wallpaper I had purchased:
However, I didn't mind the pattern and I certainly didn't want to wait another few weeks for a replacement, so I went with it.
I had planned to wallpaper the front of the doors and the two shelves inside the cabinet. The first step was to measure and trim my pieces:

This was quite easy, the wallpaper cuts like butter. I slipped a new blade into my Xacto knife and trimmed the excess paper while applying pressure to the door.
Perfect fit:

To apply the paper, I had read mixed reviews about what sort of adhesive to use. I had both Modge Podge and spray adhesive, and I figured the spray was a lot easier...

So I applied a generous amount of spray to the wood, carefully lined the paper up to the corners and smoothed it out onto the door:

And it worked!
I repeated the process for the second door and the shelf:

I then measured out the bottom of the cabinet and cut a piece to fit, and repeated the process:

Step 9: Paint the wallpaper
I was originally going to use the pistachio green color from my office closet so they would coordinate, but I realized we ran out of that paint color. I also decided I wanted to go with something a little more neutral that could work in future houses, so I browsed through the paint cans in our garage and decided to use the color from our master bathroom:


It's hard to tell the difference between the painted door on the left and plain white on the right, I know—which brings me to my next tip: colors darken over time (maybe not so much on walls, but at least on furniture and canvas!) I know this because it's happened more than once... first with the canvas art that I painted for the living room, and also our dining room table.
Here's how the table looked after I first painted it:


Yes, it's the same table. I knew this was going to happen before I painted it, so I purposely added more white than what looked correct at the time, in anticipation of it darkening.
Therefore, in these photos, the doors may look white... but I'll come back in a month or two with another photo and I think you'll notice a difference.
Moving along...this is what happened after I painted the wallpaper on the cabinet:

I immediately ripped it off and started over. This time using Modge Podge. And it worked like a charm.
If you are applying thicker wallpaper to wood: Use Modge Podge! A lot of it. Forget the spray adhesive. And also make sure your surface is smooth first. If your paper is thinner, like a wrapping paper material, I bet spray adhesive would do the trick though.
I went back to see how my doors were holding up, and noticed small bubbling in some areas. I wondered if the humidity had anything to do with it, so I brought them inside and the bubbling stopped completely. Whew.
Here's everything all dried and ready to be assembled:

Step 10: Reassemble
I picked up a pair of simple glass knobs from Hobby Lobby on sale for $5 total:

I think they're purty.
Finally, we hauled everything into the office and put it all back together. And there's my 10 step, 7 day refinishing process... tada!


And the funnest part of course.... organizing it:


Before:

After:
Cost breakdown:
Cabinet - $40
Primer - $5
Legs: $25
Wallpaper: $20
Knobs: $5
Paint: $0
Total: $95
Okay, so it isn't the cheapest furniture rehab I've ever done. But perhaps the most interesting before and after. I'm definitely digging the wallpaper, and I have a ton leftover for other potential projects.
What do you think? Anyone else ever experiment with wallpaper and furniture, or planning to now that I've shared my experience Do tell :)

No comments:
Post a Comment